- 注册
- 2004-12-05
- 帖子
- 11,317
- 反馈评分
- 0
- 点数
- 61
- 年龄
- 40
滤镜是 Photoshop 强大的工具之一,利用它可以做出千变万化的效果。
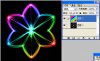
效果图:
 (screen.width*0.8-200)) this.width=(screen.width*0.8-200)'>
1、新建一个文件:
 (screen.width*0.8-200)) this.width=(screen.width*0.8-200)'>
2、填充渐变:
 (screen.width*0.8-200)) this.width=(screen.width*0.8-200)'>
3、执行“滤镜> 扭曲> 波浪”。
 (screen.width*0.8-200)) this.width=(screen.width*0.8-200)'>
4、执行“滤镜> 扭曲> 极坐标”。
 (screen.width*0.8-200)) this.width=(screen.width*0.8-200)'>
5、执行“滤镜> 素描> 铬黄”。
 (screen.width*0.8-200)) this.width=(screen.width*0.8-200)'>
6、着色。(新手ps:这里原教程忽略了,建立一个透明图层,最好关闭原背境的眼睛,图层设置如图,然后选择自己喜欢的颜色,选画笔落色)
 (screen.width*0.8-200)) this.width=(screen.width*0.8-200)'>
7、ps:完成后打开背境的眼睛,然后合拼图层,ok,完成!
 (screen.width*0.8-200)) this.width=(screen.width*0.8-200)'>
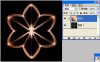
用这个办法变通做出来的其他效果:
 (screen.width*0.8-200)) this.width=(screen.width*0.8-200)'>
效果图:
1、新建一个文件:
2、填充渐变:
3、执行“滤镜> 扭曲> 波浪”。
4、执行“滤镜> 扭曲> 极坐标”。
5、执行“滤镜> 素描> 铬黄”。
6、着色。(新手ps:这里原教程忽略了,建立一个透明图层,最好关闭原背境的眼睛,图层设置如图,然后选择自己喜欢的颜色,选画笔落色)
7、ps:完成后打开背境的眼睛,然后合拼图层,ok,完成!
用这个办法变通做出来的其他效果: